
Some folks may be new to healing, and some may just need a
refresher. Something we’re going over in my raid right now is ensuring that our
healers’ setup and techniques are up to snuff. So here’s a post I wrote a while
back on improving your healing, with a few updates. Since this was buried in my
guild forums, I figured I’d put it out here and use it as a reminder for some folks
who haven’t read it yet.
Healing isn't easy. Most healing isn't hard, however. A mediocre healer can still do a fair bit of
throughput in most of the right places to get folks by in a raid setting. The
better geared/skilled your tanks, the more healers you have, and/or the more skilled
your other healers are, the less you really need to do to meet the encounter
requirements. But slacking off puts undue pressure on your other healers, and
your tanks. In a team setting like raiding, you don't want to just squeak by,
you want to actually help your raid members!
Information in your UI
I'm deliberately putting a UI tip first, because in my
experience having the correct information in front of you helps you make the
correct decisions. Overwriting HoTs, letting Earth Shield fall off, not seeing
debuffs, and so on can cost you mana, or even your tank or raider's life! Now,
what addons you use to get this information are pretty well immaterial. Be it
Clique, Vuhdo, Healbot, or Blizzard’s Default Raid Frames, you need to make
sure that your UI tells you, at a minimum:
 |
| Blizzard's Default Raid Frames are enough for me. Names removed to protect the |
Debuffs and how many stacks of that debuff there are.
If you have four people that need a disease removed, first
you need to know they need it removed, then you need to decide who's in the
most danger (triage!) because of your 8 second cooldown. Horridon
in Throne of Thunder is a prime example of this. If you don't see the number of
stacks, you have to guess, whereas if you see the number of stacks, you might
see the tank only has 1 stack, whereas a healer has 9. Clearly in that case,
despite prioritizing your tanks, you should actually clear the debuff off the
healer.
Another example, on Jin'rokh
in Throne of Thunder, is if you know how many stacks of Static Wound
your tank has when they get aggro, you'll know approximately how much raid
damage is incoming and can anticipate it rather than react to it.
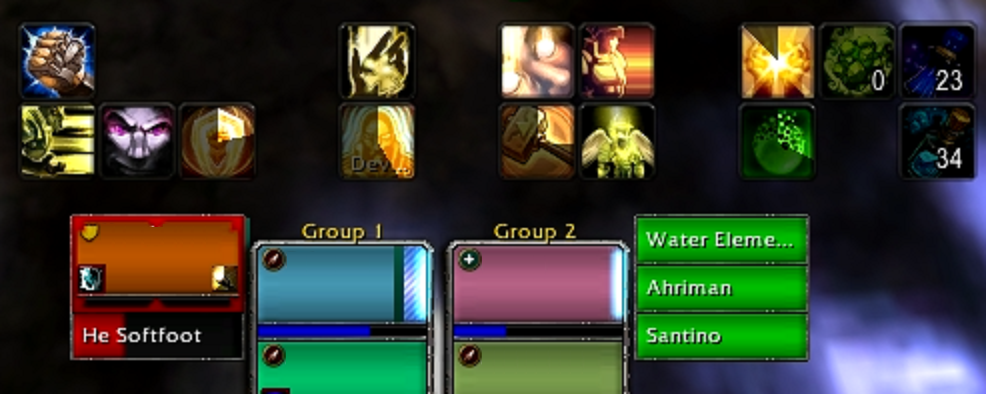
A more recent case is the Fallen Protectors in
Siege of Orgrimmar. When Shadow Word: Bane
debuffs go out and one ticks, you want to make sure you cleanse the one with 2
stacks, not with 1, or the debuff will continue to spread. In the screenshot
above, the healer should clearly prioritize the hunter (forest green in the
bottom right), rather than the Paladin in the upper right.
One more thing to keep in mind is that your UI should be
able to tell you that a debuff can be removed by you, but also should still
tell you about important debuffs that you cannot remove. Malkorok
in Siege of Orgrimmar is a good example, as the Ancient Barrier debuff tells you how much more healing
that player needs, despite the fact that you cannot (and in this case, do not
want to) remove the debuff.
Tracking Your Buffs and HoTs
Knowing if your Eternal Flame, Rejuvenation, Renew, Riptide,
Earth Shield, or any number of other HoTs or Buffs is about to fall or has
fallen off your tank is incredibly valuable. Knowing which person has your
Beacon of Light in case you forgot where you left it (or didn't even have it on
someone in the first place!) can ensure that your excess healing is going to
the right place. Priests can use it to track their Weakened Soul debuffs so you
know you cannot cast another Power Word: Shield on the target at that moment.
All of that ensures that high priority targets always have some sort of buffer
in place to help smooth incoming damage. Spike/Burst is what kills tanks, and
HoTs/Shields help reduce that. It also saves you mana by ensuring you don't
prematurely refresh these rather than waiting until the duration has almost
expired.
In the screenshot above, you can see Eternal Flame at half
duration remaining on the warrior tank (along with Beacon of Light). The druid
healer in the middle right also has Eternal Flame, but only a quarter of the
duration remains. The hunter on the bottom right has Eternal Flame as well, but
with three quarters of its duration remaining. Using that information, you as
the healer could decide to throw another HoT on someone else, or decide that by
the time you save up enough Holy Power you may want to refresh a HoT that is
about to fall off.
Aggro Notification
Knowing who has aggro, or if a raider just nabbed aggro, can
be incredibly valuable. It allows you to be more proactive rather than reactive.
By that I mean if you know Monty the Mage just pulled aggro on an add, you can
throw a HoT or a Shield on him, giving him time to drop aggro or the tank to
get aggro. Or throw a Hand of Protection or Salvation. Bosses often also
trigger the Aggro Notification if they're casting a spell directly on a player.
Megaera
in Throne of Thunder, for example, will trigger the warning when she's about to
drop a Cinders debuff on the player.
This indicator is also essential to determine which tank is
currently tanking the boss. Nearly every fight has a tank swap, and you want to
make sure that you’re healing the correct tank. For example, for Immerseus
in Siege of Orgrimmar, whoever isn’t tanking won’t be taking much damage, but
the tank that is tanking will drop quickly if you don’t realize that they’re
the one taking all the damage.
In my screenshot above, you can see folks who have aggro are
outlined in red. Make sure your UI makes it obvious. Some just put a pair of angle
brackets around the player’s name (like so: >Talarian<), and honestly
that isn’t obvious enough for me.
Range Indicator
Are you within 40 yards of your target, or did that DPS
player just wander off out of reach? Most raid frames will gray or dim the raid
frame if the player is more than 40 yards away from you. This gives you
preemptive feedback that your spell won't succeed, rather than trying to spam
the spell and wondering why it isn't going off.
Health Tracking
Uh, duh! You clearly need to know how close to dead a player
is. You don't necessarily need numbers, however. A green bar that gets shorter
as the player loses health is generally sufficient. Even better is if the
health tracker tells you about absorbs, as well, since that's effectively
health while the absorb is in effect. Incoming heals are a good bit of
information to have, but I find that to be a bonus, rather than essential.
Occasionally if I see someone else dropping a big heal, I may opt to shore the
player up with a small instant heal and move on to other targets rather than
also dropping a big heal myself.
Understand How You Heal
Druids primarily use Heal over Time spells (HoTs). Shaman
use a lot of Direct heals. Disc Priests uses many Absorbs. Paladins and Holy
Priests use a combination of those types. Knowing how these different types of
healing interact will help you understand your performance on healing meters,
and help you find your niche within your healing team.
Absorbs are the first to be eaten by damage, rather than
health. These are effectively extra health above the user's current. If the
Absorb isn't used before the buff runs out of time, the Absorb is overheal.
They are incredibly powerful because they give you a huge buffer, and Absorbs
tend to overshadow Direct Heals and HoTs on healing meters because they get
eaten first. A large Absorb, such as Power Word: Shield, can be used to protect
a target while HoTs or Direct Heals work to restore already lost health.
Direct Heals are discrete chunks of health returned to the
target. Most heals in the game are Direct. Any healing done that would restore
more health than the target has is overhealing. Direct Heals work faster than
HoTs, and often "snipe" HoTs by performing all of the healing the HoT
would have done up front.
Heal over Time (HoT) spells heal small pieces of health ever
couple of seconds until the duration of the buff runs out. Any healing done
that would restore more health than the target has is overhealing. HoTs tend to
work best in conjunction with Absorbs, or by placing them on targets just
before they take damage such that the first tick is effective healing, or on a
target that is constantly taking damage, such as tanks. HoTs work slowly, and
often result in a lot of overhealing by nature of so many Direct Heals and
Absorbs being faster to the punch, literally.
Absorbs and HoTs work to give healers more time to fill up
those health bars, whereas Direct Heals can often do the bulk of the actual
healing done. Enough strong Absorb classes (ie: Disc Priests and Paladins) in
your raid, and Direct Heals and HoTs both start to lose a bit of their luster
because the Absorbs eat up so much of the damage. Impatient or strong Direct
Heals will cause HoTs to overheal because the damage they were going to heal
has been taken care of by the faster chunk of health. However, since most
Direct Heals have a cast time, whereas most HoTs are Instant, fights with high
movement tend to favor HoTs as Direct Heals often require the healer to stand
still.
Knowing how your class' healing style works allows you to
pick the best targets to get the most out of your healing, and helps you
decipher healing meters. Everyone likes winning healing meters, but sometimes
both your cohealers and the fight mechanics can either really let you shine, or
make it difficult for you to compete, so healing meters should always be taken
with a large grain of salt.
Be Proactive, Not Reactive
This one is slightly more nebulous than the previous couple
tips. Healers are largely reactive. Someone takes damage, you cast a spell to
fill up that bar. But you always end up behind the curve that way, always
behind the wave of damage. What you want is to get ahead of that damage, and
keep things smooth and calm.
From a micro, second-to-second perspective, you can use who
has aggro to cast a HoT, a Shield, or a lengthy cast-time spell on the target.
If you know the player is about to take incoming damage, you can give them a
buffer. Or if you know the boss is casting a nasty spell in 4 seconds, like
Falling Ash
on Dark Shaman in Siege of Orgrimmar, you can start casting your big 2-second
heal a second before the cast actually goes off, so your heal goes off
immediately after it. Planning ahead on a second-to-second basis helps smooth
out damage spikes and can prevent player and tank deaths.
From a macro, minute-to-minute perspective, if you know the
flow of the fight you can anticipate damage spikes and use throughput and
defensive cooldowns appropriately. For example, you know on Jin'rokh that every
minute and a half he uses Lightning Storm.
Knowing that, you can plan to use Healing Tide Totem on the first Lightning
Storm, then Ascendance for a throughput boost on the second Lightning
Storm, or Holy Avenger on Storm 1 and Divine Favor on Storm 2, etc.
Which brings me to the last point about being Proactive,
which is to say, don't hoard your cooldowns in case of emergency. Your chances
of saving the raid in such an emergency are slim, and by not using throughput
cooldowns, you're potentially wasting HPS and mana. Instead, you should be using
your cooldowns regularly so that you don't get behind on healing during spikes
in the first place. Once you get behind on healing, it's incredibly difficult
to catch up before someone dies.
Fewer Actions to Heal
Every action you take to get a heal someone is less time
healing and more time not-healing. If you need to make a bunch of clicks and
button presses to actually heal someone, it reduces the amount of time you have
to react to new and potentially dangerous situations. So try to streamline your
healing.
If you're doing things the way they are out of the box, so
to speak, then you'd see a player in your raid frames who's taken damage, you'd
select them by clicking on them, you'd cast the spell of your choice. It sounds
micromanagey, but there's actually 4 discrete actions here, potentially:
- Moving your mouse to the raid frame you wish to target
- Clicking the raid frame you've moused over
- Moving your mouse to the spell you wish to use
- Clicking the spell you've moused over
Anything you can do to remove steps or shorten them will
increase your reaction speed and allow you to cast more spells in less time.
The first technique you should learn is keybinds. By using
your keyboard rather than your mouse to cast a spell, you've eliminated Step 3,
and changed Step 4 to a button press rather than a click. Moving a mouse across
the screen to hit a tiny button requires a fair bit of dexterity and time
(there's a number of computer and mathematics studies around this, see Fitt's Law if you're curious). You could be
shaving anywhere from a quarter second to a full second off of your cast times
by doing this, depending on where your spells are in relation to your raid
frames.
 |
| My basic keybinds are arranged such that most of my healing involves pressing 1, 2, or 3 with some key modifier like alt or shift. Note none of my oft-used spells are further really than the number 4. |
Another technique you should learn is what's commonly
referred to Mouseover Macros. You can use an addon like Clique to help set
these up, or you could write them manually (I actually do the latter). But why
would you do that? By removing the actual initial raid frame selection, you're
removing step 2 of the process above. By not having to actually select your
target, you're removing that 150ms ~ 200ms lag time from getting to the raid
frame and actually casting a spell. Alternatively, you could go with Click
Healing, where you use an addon like Clique to allow different clicks on the
raid frame to cast different spells (ie: Left-Click would cast Holy Light,
Middle-Click would cast Flash of Light, Right-Click would cast Divine Light).
That would combine Steps 2 and 4. I personally prefer mouseover macros because
there are way more spells than I have mouse buttons, and if I want to
effectively use all of my tools, I prefer to have a consistent way of using
them (see http://onemorealt.com/2011/03/click-casting-or-mouseover-macros/ for
more information comparing the two techniques).
A third technique you can use is that of actions on
Key Down. Under Interface->Combat there's a little setting called "Cast
action keybinds on key down" which should usually be selected (I have no
idea what the default is these days). What it does is when you press a keybind
for a spell, pressing down causes the spell to start. If the option was not
selected, you wouldn't begin casting until you released the keybind button.
This is minor, but can reduce your input lag by ~25ms.
After implementing all of those, steps to heal someone looks
more like this:
- Moving your mouse to the raid frame you wish to target
- Pressing the keybind for your spell
And you've shaved anywhere from ~200ms to over a second from
each of your spell casts! Given that actual server lag can compound that by
another ~200ms upwards of 600+ depending on your location (ie: Australian on a
North America server), shaving that extra time helps a lot.
Also in the spirit of reducing the amount of mouse movement you have to do, I highly suggest putting cooldowns you're going to click nearby your raid frames. This way you don't need to move your mouse very far, as well as you can easily see when they're available and when they're still recharging as the buttons are near where your eyes are resting anyways.
Also in the spirit of reducing the amount of mouse movement you have to do, I highly suggest putting cooldowns you're going to click nearby your raid frames. This way you don't need to move your mouse very far, as well as you can easily see when they're available and when they're still recharging as the buttons are near where your eyes are resting anyways.
 |
| I keep mine just above my raid frames. Anything that's situational, or for the most part doesn't require a target, sits on this set of bars in easy reach. |
And that's it for now! If you've got more tips for healers,
want to discuss other tips, ask questions, etc. please do so! I'd love to find
out more ways to improve my own healing, and hear back from folks trying some
of these things to see if they helped, or if they need a bit of fine-tuning.
No comments:
Post a Comment